Saturday, April 23, 2011

just playing around

I was playing around with the idea of random shapes cut out of paper, as a starting point for a print. It turned into a fish bowl, which I really liked, of course a fish bowl needs a fish. I wasn't sure if the fish would be in or above the bowl so the bowl is a little low. Rather than printing I appliqued one on, next time I think I would print it. This is a another thrift store tee, lots of fun for only 75c.


This was inspired by a book of baby animals that I read to my little man repeatedly. I love this print! The only thing is doing really small holes with a craft knife in plastic is tricky. So for some reason I thought I'd try leaving them out of the stencil to worry about later. Not the best idea my practice tee worked better than the new tee, which had to be touched up. There is a tool I have seen for really small holes that I think is called a Japanese punch. If any body knows where I can get my hands on one let me know.


Tuesday, April 19, 2011

boring tee to new fave.

Getting out of town for me is a treat, so when I found myself having to run an errand in Cranbrook I was very pleased. I had just enough time to run through the thrift store and the super store, woohoo! I bought a few very cheap tees at the super store (all $6 each), when I got home and tried the plain one on again I realised it was way to long.

So what to do.. I didn't really want to try hemming it, I considered ruching the waist.. but then of course A. from our ilan and quinn had the idea of sewing elastic up the sides! Great, that solved the length issue and added a bit of interest. Then I wanted to do something I have seen on a lot of blogs which is to sew strips of jersey fabric to create a flower.. the only jersey on hand was brown.
It's my first attempt at a jersey feature on a tee and i don't mind it at all. I've been waiting for a chance to incorpate a sewn embellishment and a print, so now that I'd sewn the flower I cut a stencil of a similar circular flower.

Inspired by a dress I was given that had the same colour used for the print as for the fabric. I decided to print the flower it in three different shades of green to match the fabric almost perfectly. Looked great on the dress not sure if it has the same effect on my tee... Having said that I love the way this turned out and will be sporting it any chance I get. :)


Thursday, April 14, 2011

just for the practice

While my little man had a 2 and a half hour nap today (unheard of in our house) I decided to test out the stencils that I cut out at craft night yesterday. I like the stencils, but I really liked making craft night for the 3rd week in a row!!

I am trying to try doing some more floral-ish prints as everything I have printed lately has been for kids tees


The best part of the day though was when my bike trailer arrived at the front door. I am so excited to take it for a test run, it is a Burley Bee. I did a lot of online window shopping so I will let you know what I think of it. Must just say that it is one of the lightest weighing in at 19lbs, which will help for the hills as my little man is already 30lbs.

Wednesday, April 13, 2011

simple screen printing for small projects

My first Tutorial! I really enjoy screen printing with stencils and plan to run some short courses in my community by the end of the year. So as a bit of a practice I put this together.

I always thought that you needed a lot of expensive equipment to screen print. Not so at all, you can use a lot of cheap, easy to find craft supplies.

You will need:
1 Embroidery hoop plastic or wood (you can find these at a thrift store)
1 sheer curtain panel/fabric (Walmart sells these under $10 and you'll have heaps left over)
masking tape
craft knife
scissors
fabric paint
a piece of paper or thin plastic (Mylar) for your stencil
a simple picture for you stencil
an old bank card
a spoon

Note about paint: you can buy fabric paint at places like Walmart and it's a good way to get started and it's cheap. However if you enjoy printing, for a better result you can buy screen printing fabric paint like Speedball. This is a must if you buy or make a screen with actual screen printing mesh.


Put you fabric into the embroidery hoop and do up the screw.
Cut around the hoop leaving an 1/2 to and inch of fabric.
Then gently go around pulling fabric until it is tight and smooth across the hoop, to form the screen.


Printing: first you need to draw or trace your image onto you plastic/paper, then use a craft knife to cut out the areas you wish to be printed. I am using Mylar (plastic) as I will keep this stencil and use it again.

Align Center

Getting ready to print: first you need to tape you fabric to a smooth surface (put a piece of paper under it to make clean up easier), you want to stretch the fabric a little as you do this.

Set out an area beside where you are printing, covered in paper and place your paint here and a spoon (not pictured) this is so you can put your screen down in between prints and clean up.

Lay your stencil on the fabric, (some people tape it to the screen so it won't move however using a plastic stencil that bows means you can have a less than perfect print).


Place the screen on top of the stencil and fabric, I drew a boarder around my stencil so that I don't put ink over the edge, you can do this with tape if you tape the stencil to the screen.

Use a spoon to put a generous line of paint above the cut out part of the stencil.


Pulling the Paint: tilt your old bank card towards you, put it just above the line of paint, and with the other hand hold your screen in place.

Now pull the paint down till you reach just under the cut out area of your stencil staying inside the boarder. You can do another pull of paint if there are any areas that need or missed paint. (I usually do to pulls of paint)

Your bank card will have a lot of paint on it so put it down on the papered work area.


Last step, gently pull the screen up from one side. You can move straight over to another print if you have more fabric set up. The stencil will be stuck to the screen which is handy so just lay it down on the fabric as is.

If not take you screen to the sink and wash it out as paint left in the screen will dry and not come out. Also wash your stencil if it's plastic, your bank card and spoon.


This screen set-up can be re-used again and again, just let it dry out before you print again. You don't want to use paper towel to dry a your screen as the fibers can stay in the mesh and effect your next print.

Heat setting: once your print has completely dried you have to iron it on the highest heat setting within a week to set the paint, then it can be washed as needed.
*Different paint brands may have different guidelines so read their info before you do this step.

I hope you have as much fun with this as I do.

Wednesday, April 6, 2011

inspiration found

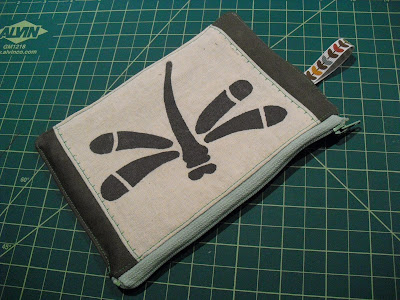
I have been trying to find small projects that I can churn out for the market that will draw people to the table.. small zip pouches are what I came up with. Due to my lack of space I waste time pottering between the cutting, ironing and sewing areas. So at the moment these are taking me to long for me to be able to sell them for $10.

As with most of my recent projects I've been incorporating my printed images. There are a few tutorials out there for zipper pouches, I choose this one from twelve22 the first one I missed a step about sewing up to the zip (just before you turn it out the right way).. so second time round it went a bit smoother.

the dragon fly one I made as practice (using up a less than perfect print made me feel like i wasn't wasting fabric too) and is my own, the bird will be kept for a birthday ;) later in the year.


I love doing projects with lining, as it lets me use all the fabric that I am not in love with.

Tuesday, April 5, 2011

any reason to have a coffee with the girls

So today a few craft friends and I met for coffee, we are hashing out some details to do some advertising together and a name for all of us to work under..

I also got asked for my first donation for a little door prize, and yep I know it doesn't really count when it's a friend organising the event.. but still. So I decided to donate the plain printed fish tee from an earlier post (my little man already has the other 2 in his closet so he doesn't need the 3rd one). Here is my packaging, I haven't got to the stage of uniformed cute packaging so I just wrapped it like a gift...